



-
Public Group
-
43 Posts
-
41 Photos
-
0 Videos
-
Natural
Search

 Arabic
 French
 Spanish
 Portuguese
 Deutsch
 Turkish
 Dutch
 Italiano
 Russian
 Romaian
 Portuguese (Brazil)
 Greek
Recent Updates
-
SAME WINTER TENT. SAME FREEZING TEMPERATURE. BUT ONE SMALL CHANGE COULD MAKE A HUGE DIFFERENCE!
Imagine sleeping in a snow-covered forest, wrapped inside a sleeping bag, only to wake up shivering despite having plenty of clothing.
The problem might not be your sleeping bag. It could be what’s underneath you.
This picture compares two cold-weather sleeping setups—and reveals a survival principle that many beginners overlook.
TOP: THE ELEVATED CAMP COT
The camper sleeps on a raised canvas cot while freezing air circulates underneath.
Although a cot keeps you off the snow, cold air can carry heat away from its underside. Your body also compresses the sleeping bag insulation beneath you, reducing its ability to trap warmth.
BOTTOM: THE PINE-BOUGH MATTRESS
Here, the camper rests on a thick layer of evergreen branches.
The branches create pockets of relatively still air, helping reduce heat transfer to the frozen ground. When kept dry and sufficiently thick, natural vegetation can provide some emergency insulation.
But there’s an important detail: Pine branches don’t generate heat or magically reflect all your body warmth. Their main benefit is slowing heat loss through trapped air.
THE SURVIVAL FACT MOST PEOPLE MISS
A warm sleeping bag isn’t enough if the insulation beneath your body is inadequate.
A properly rated insulated sleeping pad is generally more reliable than either setup shown. You can even use one on top of a cot to reduce heat loss.
And if you’re relying on natural materials, avoid cutting live branches unnecessarily—use permitted, dry materials whenever possible.
HERE’S THE QUESTION FOR EXPERIENCED CAMPERS:
You’re spending a night in a freezing forest and can choose only one of these setups:
A) An elevated camping cot with no insulated pad.
A thick pine-bough mattress beneath your sleeping bag.
Which would you choose—and why?
Have you ever experienced a freezing night despite using a warm sleeping bag? What finally made the difference?
Share this with someone who loves winter camping. It’s a survival lesson worth knowing before the temperature drops!
#WinterCamping #BushcraftSkills #WildernessSurvival
SAME WINTER TENT. SAME FREEZING TEMPERATURE. BUT ONE SMALL CHANGE COULD MAKE A HUGE DIFFERENCE
🥶🏕️ SAME WINTER TENT. SAME FREEZING TEMPERATURE. BUT ONE SMALL CHANGE COULD MAKE A HUGE DIFFERENCE! Imagine sleeping in a snow-covered forest, wrapped inside a sleeping bag, only to wake up shivering despite having plenty of clothing. The problem might not be your sleeping bag. It could be what’s underneath you. This picture compares two cold-weather sleeping setups—and reveals a survival principle that many beginners overlook. ❄️ TOP: THE ELEVATED CAMP COT The camper sleeps on a raised canvas cot while freezing air circulates underneath. Although a cot keeps you off the snow, cold air can carry heat away from its underside. Your body also compresses the sleeping bag insulation beneath you, reducing its ability to trap warmth. 🌲 BOTTOM: THE PINE-BOUGH MATTRESS Here, the camper rests on a thick layer of evergreen branches. The branches create pockets of relatively still air, helping reduce heat transfer to the frozen ground. When kept dry and sufficiently thick, natural vegetation can provide some emergency insulation. But there’s an important detail: Pine branches don’t generate heat or magically reflect all your body warmth. Their main benefit is slowing heat loss through trapped air. 🔥 THE SURVIVAL FACT MOST PEOPLE MISS A warm sleeping bag isn’t enough if the insulation beneath your body is inadequate. A properly rated insulated sleeping pad is generally more reliable than either setup shown. You can even use one on top of a cot to reduce heat loss. And if you’re relying on natural materials, avoid cutting live branches unnecessarily—use permitted, dry materials whenever possible. 💬 HERE’S THE QUESTION FOR EXPERIENCED CAMPERS: You’re spending a night in a freezing forest and can choose only one of these setups: A) 🛏️ An elevated camping cot with no insulated pad. 😎 🌲 A thick pine-bough mattress beneath your sleeping bag. Which would you choose—and why? 👇 Have you ever experienced a freezing night despite using a warm sleeping bag? What finally made the difference? 🔄 Share this with someone who loves winter camping. It’s a survival lesson worth knowing before the temperature drops! #WinterCamping #BushcraftSkills #WildernessSurvival 🥶🏕️ SAME WINTER TENT. SAME FREEZING TEMPERATURE. BUT ONE SMALL CHANGE COULD MAKE A HUGE DIFFERENCE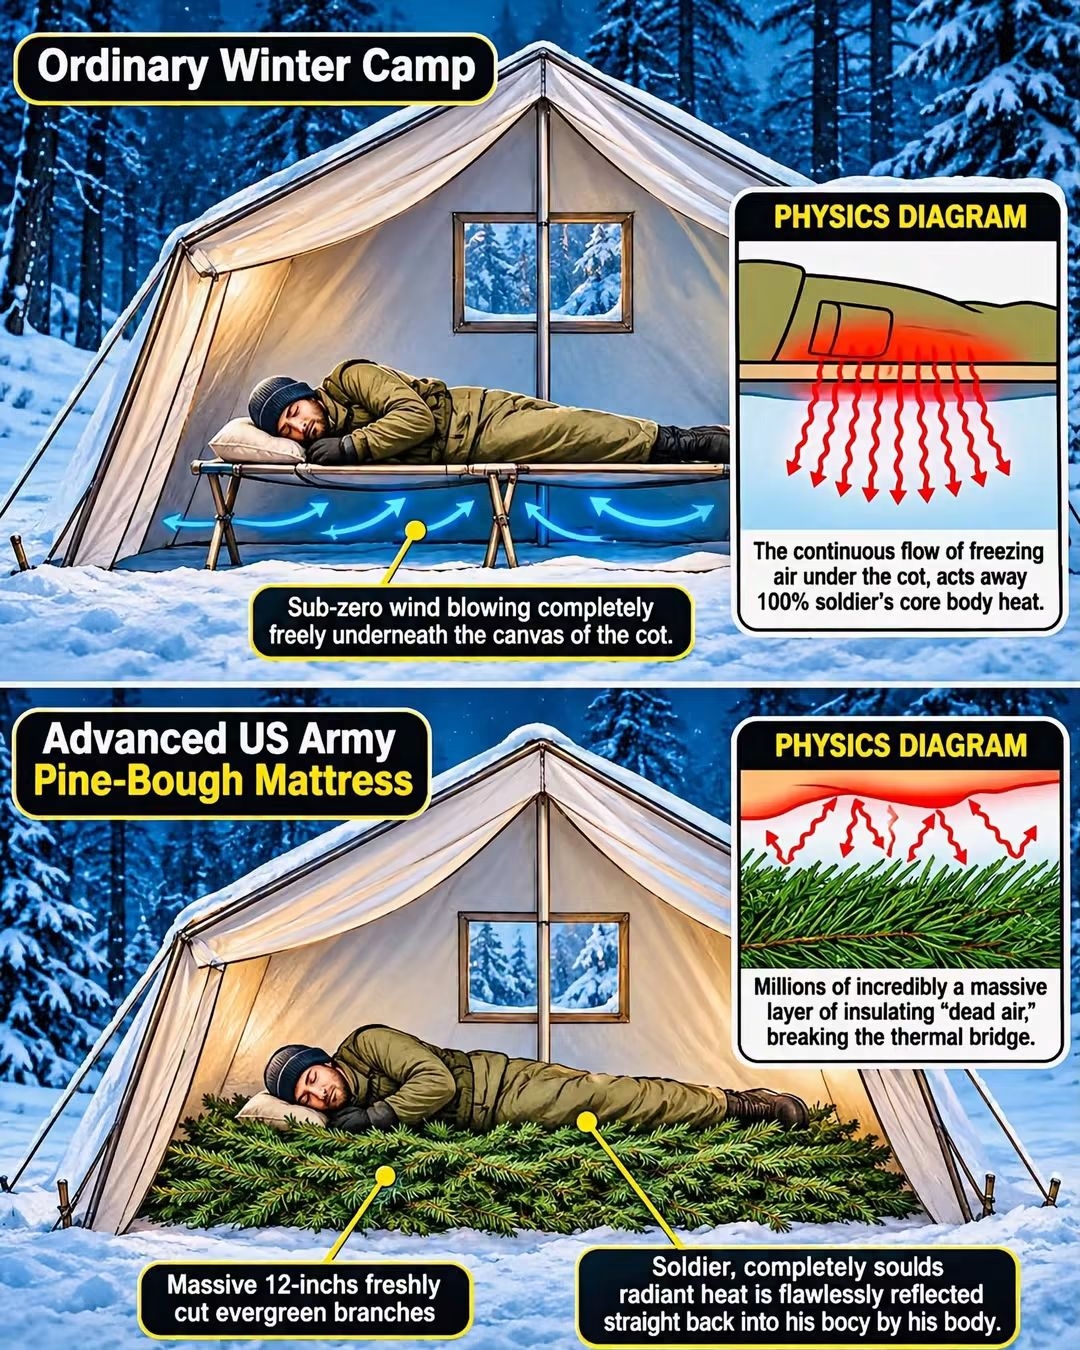 0 Comments 0 Shares 3 Views
-
https://x.com/Rainmaker1973/status/2117888326703481122?a=_uLRn4kU7bJdTGjdt_s&s=200 Comments 0 Shares 4 Views
-
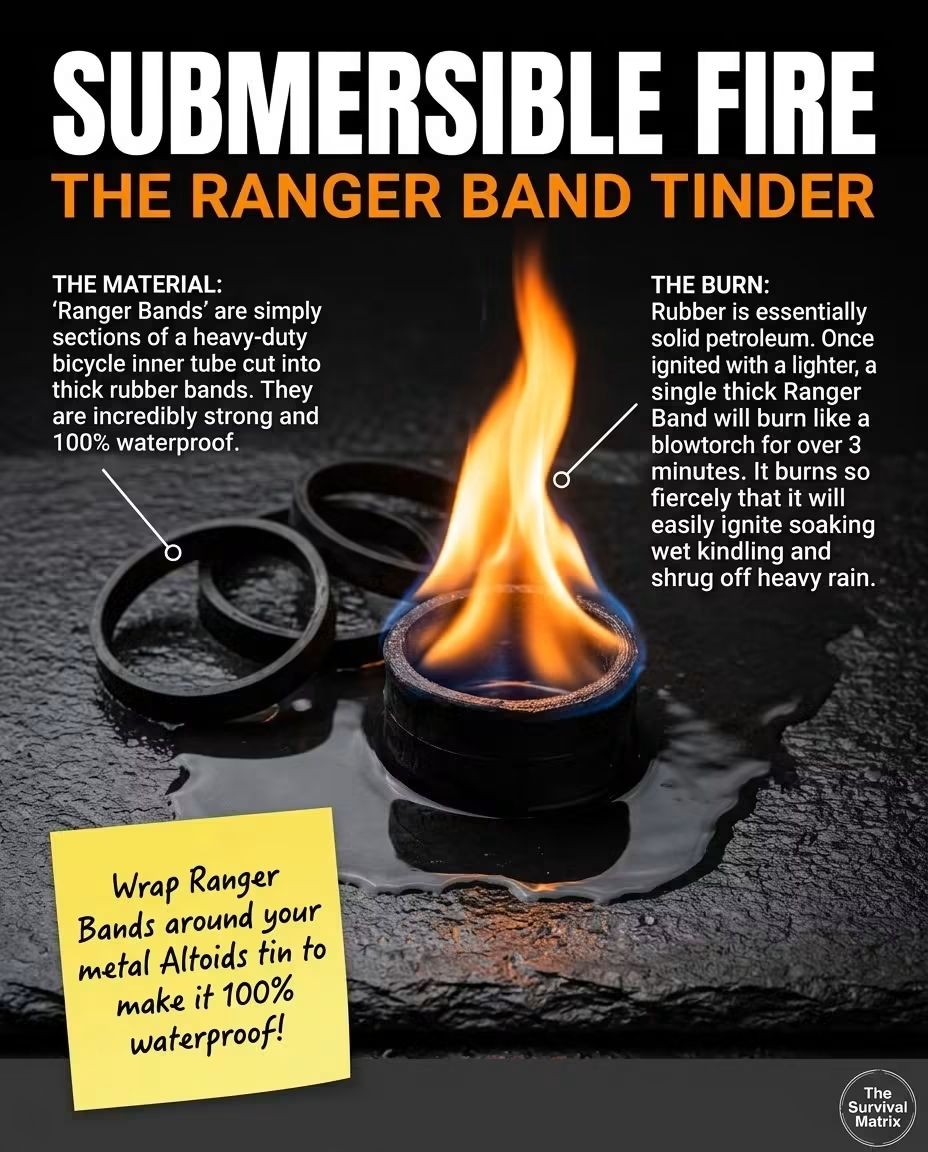
Used extensively by military special forces, the "Ranger Band" is simply a piece of an old bicycle inner tube cut into a thick rubber band. Because rubber is essentially solid petroleum, it makes the ultimate extreme-weather fire starter! Once lit, a single Ranger Band burns like a 3-minute blowtorch, producing a flame so hot and aggressive that it will dry out and ignite soaking wet kindling in the middle of a monsoon. Wrap them around your gear! #SurvivalHacks #FireStarter #TacticalGearUsed extensively by military special forces, the "Ranger Band" is simply a piece of an old bicycle inner tube cut into a thick rubber band. Because rubber is essentially solid petroleum, it makes the ultimate extreme-weather fire starter! Once lit, a single Ranger Band burns like a 3-minute blowtorch, producing a flame so hot and aggressive that it will dry out and ignite soaking wet kindling in the middle of a monsoon. Wrap them around your gear! 🔥🚴♂️ #SurvivalHacks #FireStarter #TacticalGear
 0 Comments 0 Shares 10 Views
-
It costs just $3 at the hardware store, but a 5-Gallon Bucket is the ultimate investment for your property! By placing a bucket under your HVAC condensation line, you can prevent $10,000 in catastrophic basement water damage. You can upgrade it with a Gamma-Seal lid to create a waterproof vault for your expensive food, or turn it into a premium DIY gravity water filter. What is the most brilliant MacGyver hack you've ever used a bucket for? Share to help a homeowner!
#HomeImprovement #GridDownGuardian #MacGyverHacks #LifeHacks #RealEstate #ProtectYourInvestment #WaterDamage #PrepperSkills #DIYProjects #HomeMaintenanceIt costs just $3 at the hardware store, but a 5-Gallon Bucket is the ultimate investment for your property! 🪣💧 By placing a bucket under your HVAC condensation line, you can prevent $10,000 in catastrophic basement water damage. You can upgrade it with a Gamma-Seal lid to create a waterproof vault for your expensive food, or turn it into a premium DIY gravity water filter. What is the most brilliant MacGyver hack you've ever used a bucket for? Share to help a homeowner! #HomeImprovement #GridDownGuardian #MacGyverHacks #LifeHacks #RealEstate #ProtectYourInvestment #WaterDamage #PrepperSkills #DIYProjects #HomeMaintenance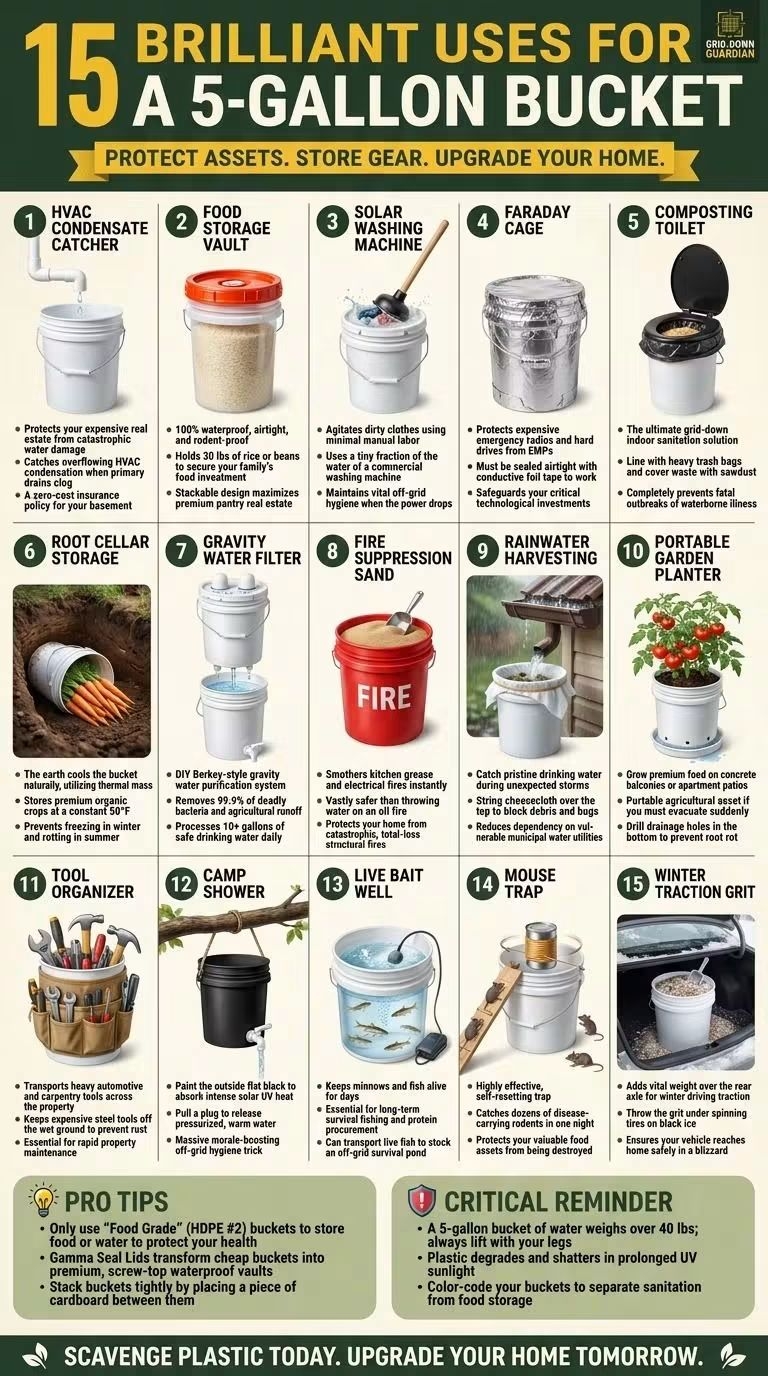 0 Comments 0 Shares 9 Views
-
You can survive exactly three days without water. When the municipal pumps shut down, your taps run dry instantly. A single heavy rainstorm can dump 600 gallons of water onto your roof—but if you don't have gutters, First-Flush diverters, and IBC Totes set up, it will just wash away into the dirt! How many gallons of water can you currently capture and store at your house? Share this to help a homesteader!
#RainwaterHarvesting #WaterStorage #GridDownGuardian #OffGridPlumbing #Homesteading #PrepperSkills #WaterPurification #LifeHacks #SelfReliance #DIYprojectsYou can survive exactly three days without water. When the municipal pumps shut down, your taps run dry instantly. A single heavy rainstorm can dump 600 gallons of water onto your roof—but if you don't have gutters, First-Flush diverters, and IBC Totes set up, it will just wash away into the dirt! 🌧️🛢️ How many gallons of water can you currently capture and store at your house? Share this to help a homesteader! #RainwaterHarvesting #WaterStorage #GridDownGuardian #OffGridPlumbing #Homesteading #PrepperSkills #WaterPurification #LifeHacks #SelfReliance #DIYprojects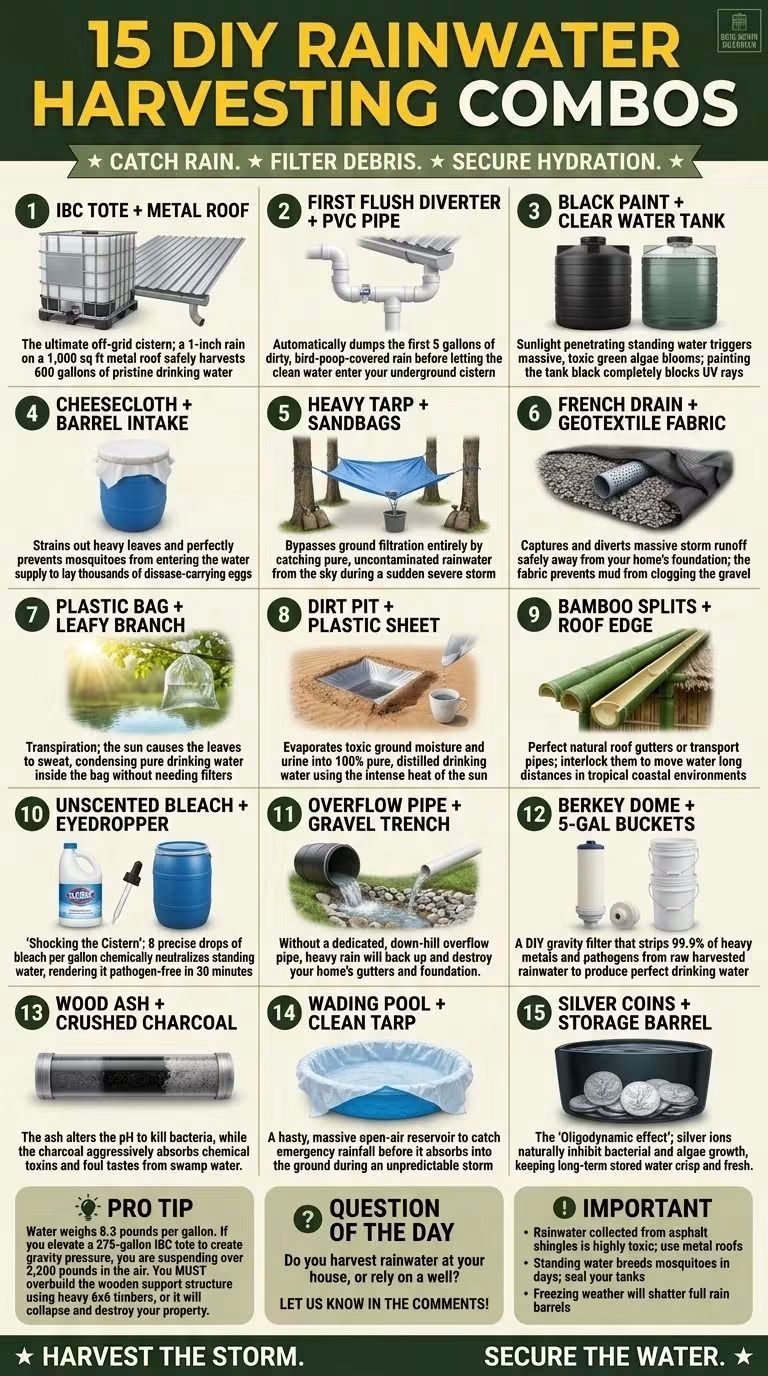 0 Comments 0 Shares 10 Views
-
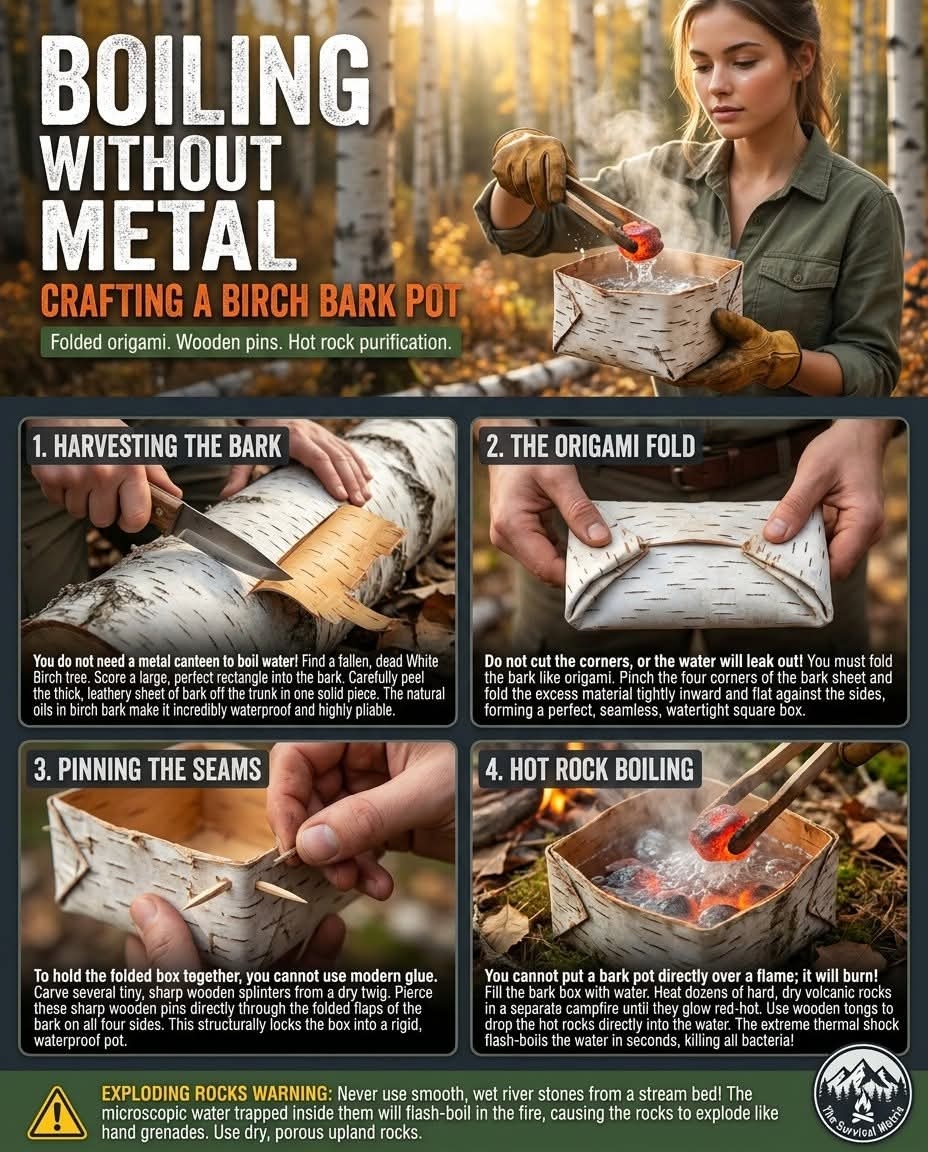
If you lose your metal canteen in the wilderness, purifying water to prevent fatal dysentery seems impossible. You can't put a wooden bowl or a plastic bottle directly into the fire without it burning to ash! The ancient solution is crafting a Birch Bark Pot. By harvesting a massive, leathery sheet of white birch bark and folding the corners inward like seamless origami, you create a 100% watertight box. Pin the corners together with sharp wooden splinters. Because you can't put bark on a fire, you must heat granite stones in the coals until they glow red-hot and transfer them directly into your water bowl using wooden tongs. The water will violently flash-boil in seconds! Have you ever tried primitive hot-rock boiling? #BushcraftSkills #WaterPurification #SurvivalHacksIf you lose your metal canteen in the wilderness, purifying water to prevent fatal dysentery seems impossible. You can't put a wooden bowl or a plastic bottle directly into the fire without it burning to ash! The ancient solution is crafting a Birch Bark Pot. By harvesting a massive, leathery sheet of white birch bark and folding the corners inward like seamless origami, you create a 100% watertight box. Pin the corners together with sharp wooden splinters. Because you can't put bark on a fire, you must heat granite stones in the coals until they glow red-hot and transfer them directly into your water bowl using wooden tongs. The water will violently flash-boil in seconds! Have you ever tried primitive hot-rock boiling? 🌲🔥 #BushcraftSkills #WaterPurification #SurvivalHacks
 0 Comments 0 Shares 15 Views
-
Stop sinking fence posts that rot out in just 2 to 3 years! If you are tired of replacing wooden posts eaten by subterranean termites and destroyed by ground moisture, you need to use this ancient Japanese wood preservation technique known as Shou Sugi Ban (Yakisugi).
Charring your wooden fence posts before putting them in the ground is one of the best DIY homesteading, carpentry, and woodworking tricks to dramatically extend the lifespan of your outdoor structures. When you burn the outer layer of the wood, it neutralizes the cellulose and natural sugars that attract wood-boring insects. At the same time, it creates a durable carbonized outer barrier that naturally repels moisture, soil rot, moss, and fungal decay while protecting the solid core inside.
Why Traditional Methods Fail:
Standard untreated wood acts like a sponge, drawing groundwater straight up into the end grain through capillary action. Over time, moisture causes the wood fibers to expand, crack, and rot, opening up the perfect entrance for termites and carpenter ants. Pressure-treated posts can help, but chemically treated wood can leach harsh chemicals into your garden soil over time and often warps or splits as it dries out. Charring provides an eco-friendly, chemical-free alternative that locks out rot for decades.
Here is your complete, step-by-step guide to charring wooden fence posts the right way for maximum longevity:
1️⃣ Select and Dry Your Wood: Start with dry, untreated softwood or hardwood posts (such as cedar, pine, fir, or oak). Ensure the wood is completely seasoned because wet or green timber will not char properly and can trap internal moisture.
2️⃣ Set Up a Safe Work Area: Clear away dry grass, leaves, and flammable debris. Always work outdoors in a well-ventilated area, wear safety glasses and leather work gloves, and keep a garden hose or fire extinguisher nearby.
3️⃣ Apply the Heat: Using a heavy-duty propane weed torch or blowtorch, evenly heat the bottom section of the post—specifically targeting the area that will be buried underground plus an extra 6 inches above the soil line where ground-level moisture and oxygen meet.
4️⃣ Achieve the "Alligator" Finish: Move the flame steadily back and forth until a deep, alligator-skin texture of char forms uniformly around the wood. You want a solid carbon layer about 1/8 inch thick, not just a light surface scorch.
5️⃣ Cool and Extinguish: Immediately spray the charred post with water or wipe it down with a damp rag to quench any embers and stop the burning process before it degrades the structural core.
6️⃣ Brush and Seal (Optional Step): Let the post dry completely. If you want a cleaner finish, brush off loose surface soot with a wire brush and apply a heavy coat of natural exterior oil (like raw linseed oil or tung oil) to lock in the protection even further.
7️⃣ Install with Proper Drainage: Set your charred post into the ground with 4 to 6 inches of crushed gravel at the bottom of the post hole to allow groundwater to drain freely away from the base, preventing standing water from pooling beneath it.
Taking an extra 10 minutes to torch your posts today will save you days of grueling labor and hundreds of dollars in replacement materials down the road. Say goodbye to snapping fence lines and hello to permanent, DIY-friendly outdoor durability!
Save this post for your next backyard fencing project, and share it with a fellow DIYer who loves building things to last!
#FenceBuilding #WoodworkingTips #HomesteadingSkills #DIYFence #WoodPreservation #HandymanAcademy #BackyardProjects #CarpentryTips #OutdoorBuilding #TermitePrevention #ToolSkills #DIYHomeImprovement #FenceRepair
Stop sinking fence posts that rot out in just 2 to 3 years! 🛑🪵 If you are tired of replacing wooden posts eaten by subterranean termites and destroyed by ground moisture, you need to use this ancient Japanese wood preservation technique known as Shou Sugi Ban (Yakisugi). Charring your wooden fence posts before putting them in the ground is one of the best DIY homesteading, carpentry, and woodworking tricks to dramatically extend the lifespan of your outdoor structures. When you burn the outer layer of the wood, it neutralizes the cellulose and natural sugars that attract wood-boring insects. At the same time, it creates a durable carbonized outer barrier that naturally repels moisture, soil rot, moss, and fungal decay while protecting the solid core inside. Why Traditional Methods Fail: Standard untreated wood acts like a sponge, drawing groundwater straight up into the end grain through capillary action. Over time, moisture causes the wood fibers to expand, crack, and rot, opening up the perfect entrance for termites and carpenter ants. Pressure-treated posts can help, but chemically treated wood can leach harsh chemicals into your garden soil over time and often warps or splits as it dries out. Charring provides an eco-friendly, chemical-free alternative that locks out rot for decades. Here is your complete, step-by-step guide to charring wooden fence posts the right way for maximum longevity: 1️⃣ Select and Dry Your Wood: Start with dry, untreated softwood or hardwood posts (such as cedar, pine, fir, or oak). Ensure the wood is completely seasoned because wet or green timber will not char properly and can trap internal moisture. 2️⃣ Set Up a Safe Work Area: Clear away dry grass, leaves, and flammable debris. Always work outdoors in a well-ventilated area, wear safety glasses and leather work gloves, and keep a garden hose or fire extinguisher nearby. 3️⃣ Apply the Heat: Using a heavy-duty propane weed torch or blowtorch, evenly heat the bottom section of the post—specifically targeting the area that will be buried underground plus an extra 6 inches above the soil line where ground-level moisture and oxygen meet. 4️⃣ Achieve the "Alligator" Finish: Move the flame steadily back and forth until a deep, alligator-skin texture of char forms uniformly around the wood. You want a solid carbon layer about 1/8 inch thick, not just a light surface scorch. 5️⃣ Cool and Extinguish: Immediately spray the charred post with water or wipe it down with a damp rag to quench any embers and stop the burning process before it degrades the structural core. 6️⃣ Brush and Seal (Optional Step): Let the post dry completely. If you want a cleaner finish, brush off loose surface soot with a wire brush and apply a heavy coat of natural exterior oil (like raw linseed oil or tung oil) to lock in the protection even further. 7️⃣ Install with Proper Drainage: Set your charred post into the ground with 4 to 6 inches of crushed gravel at the bottom of the post hole to allow groundwater to drain freely away from the base, preventing standing water from pooling beneath it. Taking an extra 10 minutes to torch your posts today will save you days of grueling labor and hundreds of dollars in replacement materials down the road. Say goodbye to snapping fence lines and hello to permanent, DIY-friendly outdoor durability! 🛠️💪 Save this post for your next backyard fencing project, and share it with a fellow DIYer who loves building things to last! 📌 #FenceBuilding #WoodworkingTips #HomesteadingSkills #DIYFence #WoodPreservation #HandymanAcademy #BackyardProjects #CarpentryTips #OutdoorBuilding #TermitePrevention #ToolSkills #DIYHomeImprovement #FenceRepair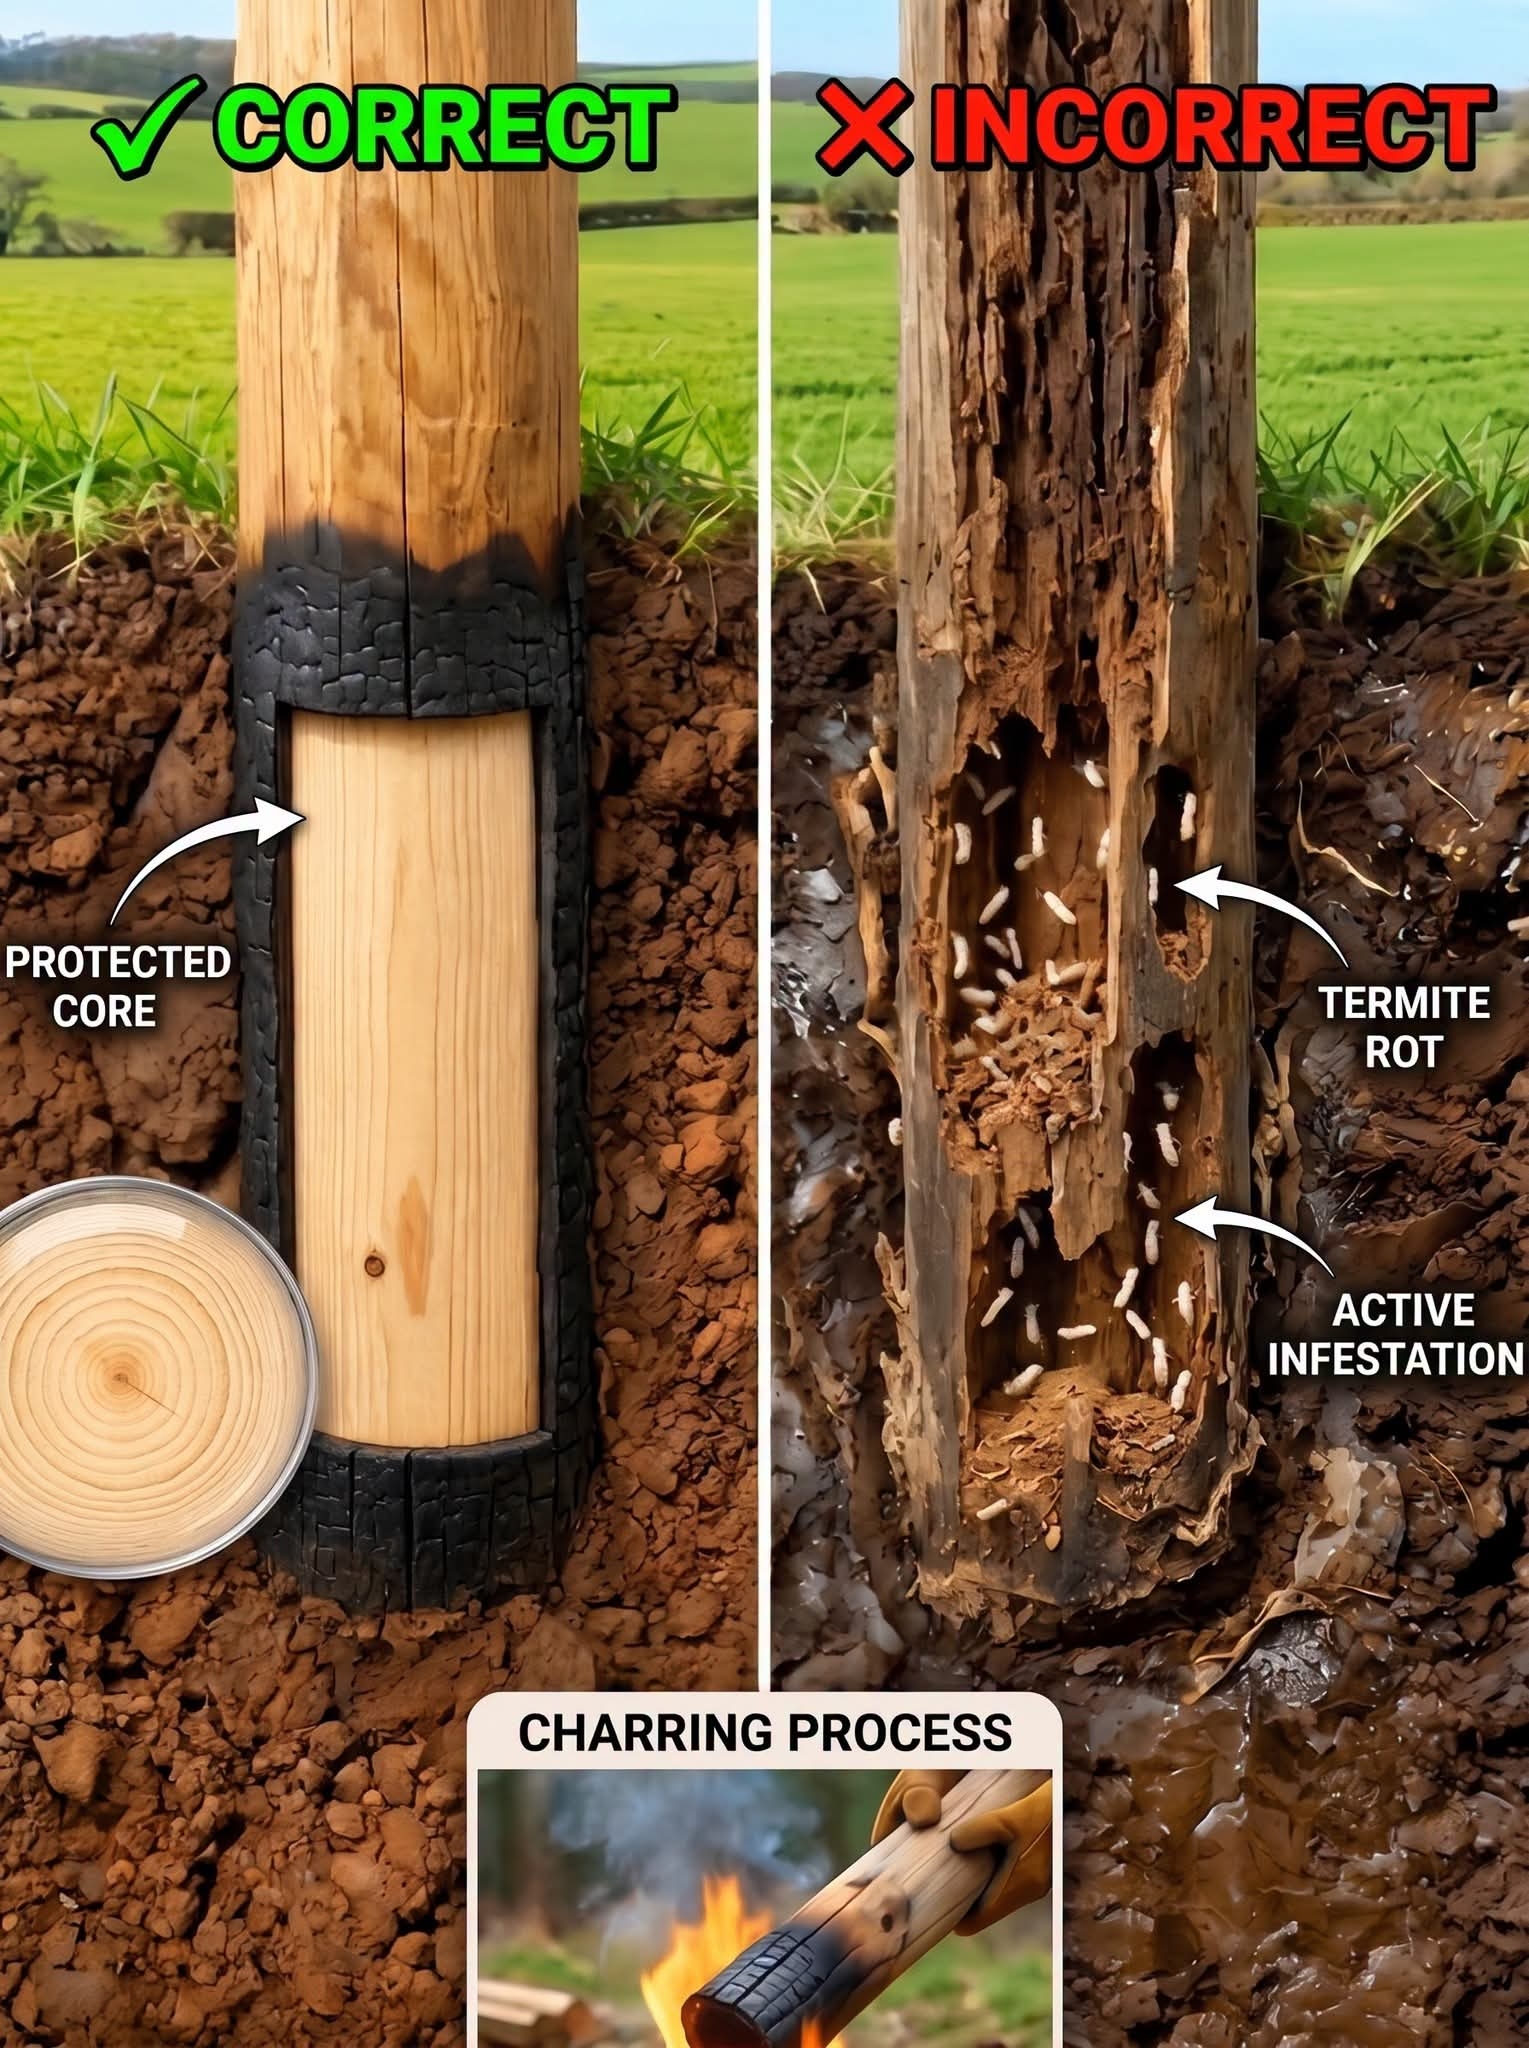 0 Comments 0 Shares 21 Views
-
EVASION TACTICS: If a hostile militia or looting gang sweeps your neighborhood, your instinct will be to run to the Attic or hide under the bed. THIS IS FATAL! Attics are dead ends, and Thermal Drones can see your body heat glowing right through the roof! You must build false walls or hide under floorboards. Furthermore, if you hold your breath in fear, you will eventually GASP loudly! You must take slow, shallow breaths through your nose. Do you know how to become a ghost during a search?
#Evasion #TacticalPrep #UrbanSurvival #GrayMan #HomeDefense #PrepperTips #SHTF #GridDown #SurvivalSkills #Preparedness⚠️ EVASION TACTICS: If a hostile militia or looting gang sweeps your neighborhood, your instinct will be to run to the Attic or hide under the bed. THIS IS FATAL! Attics are dead ends, and Thermal Drones can see your body heat glowing right through the roof! You must build false walls or hide under floorboards. Furthermore, if you hold your breath in fear, you will eventually GASP loudly! You must take slow, shallow breaths through your nose. Do you know how to become a ghost during a search? 👻🚪 #Evasion #TacticalPrep #UrbanSurvival #GrayMan #HomeDefense #PrepperTips #SHTF #GridDown #SurvivalSkills #Preparedness 0 Comments 0 Shares 16 Views
-
Why does washing a severe skin rash with fresh water make it swell and rot, while washing it with boiled Oak tree bark cures it overnight?
Treating severe weeping rashes, mild burns, or chafing in the wilderness requires changing the chemical structure of your own damaged skin to lock out bacteria.
If an ordinary survivor constantly washes a weeping rash with fresh water, it is a biological disaster! Warm water acts as a cellular solvent. It continuously softens the already damaged, fragile skin cells. This "osmotic saturation" causes the cells to swell and easily rupture. The skin continues to weep fluid, leaving an open, wet gateway for aggressive fungal and bacterial infections to take hold.
Wilderness medics deploy absolute biochemical protein precipitation: The Oak Tannin Wash!
Shrink the skin! The survivor strips pieces of the inner bark from an Oak tree, boils them in water to create a dark, rich brown tea, lets it cool, and applies the liquid directly to the wound. The chemistry is a medical miracle! Oak bark is densely packed with Tannic Acid. Tannins are powerful natural astringents. When applied to a wound, the tannic acid chemically reacts with your damaged flesh, rapidly shrinking and drawing the skin proteins tightly together. This instantly halts the weeping, mechanically tightens the pores, and forms a hard, dry, sterile biological shield over the rash!
Fatal osmotic tissue swelling or a genius biochemical protein shrink-wrap?
#WildernessMedicine #FirstAid #SurvivalTactics #BotanyFacts #ChemistryFacts #BiologyFacts #OutdoorSurvival #ScienceFacts #BushcraftWhy does washing a severe skin rash with fresh water make it swell and rot, while washing it with boiled Oak tree bark cures it overnight? 🌳🩹 Treating severe weeping rashes, mild burns, or chafing in the wilderness requires changing the chemical structure of your own damaged skin to lock out bacteria. If an ordinary survivor constantly washes a weeping rash with fresh water, it is a biological disaster! Warm water acts as a cellular solvent. It continuously softens the already damaged, fragile skin cells. This "osmotic saturation" causes the cells to swell and easily rupture. The skin continues to weep fluid, leaving an open, wet gateway for aggressive fungal and bacterial infections to take hold. Wilderness medics deploy absolute biochemical protein precipitation: The Oak Tannin Wash! Shrink the skin! The survivor strips pieces of the inner bark from an Oak tree, boils them in water to create a dark, rich brown tea, lets it cool, and applies the liquid directly to the wound. The chemistry is a medical miracle! Oak bark is densely packed with Tannic Acid. Tannins are powerful natural astringents. When applied to a wound, the tannic acid chemically reacts with your damaged flesh, rapidly shrinking and drawing the skin proteins tightly together. This instantly halts the weeping, mechanically tightens the pores, and forms a hard, dry, sterile biological shield over the rash! Fatal osmotic tissue swelling or a genius biochemical protein shrink-wrap? 👇 #WildernessMedicine #FirstAid #SurvivalTactics #BotanyFacts #ChemistryFacts #BiologyFacts #OutdoorSurvival #ScienceFacts #Bushcraft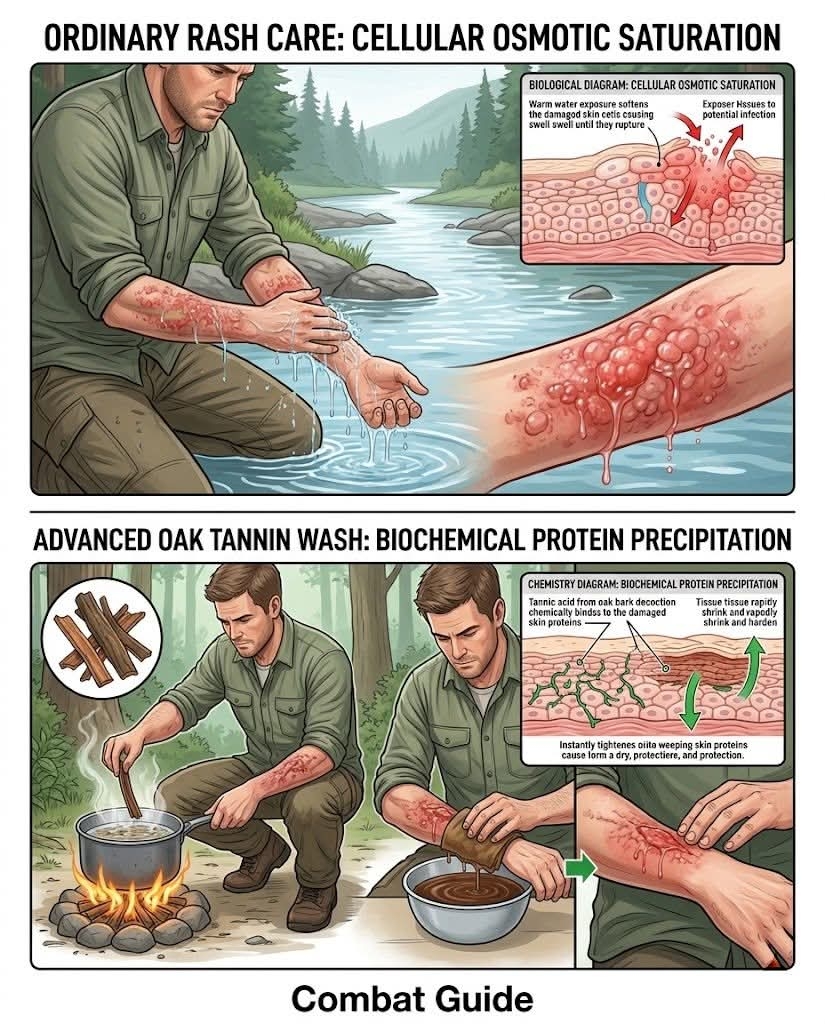 0 Comments 0 Shares 24 Views

More Stories